By Pom, founder · 2026-03-04
How a microcement floor is built: seven layers from substrate to finish
“Seven layers. Not a single one is merely decorative.”
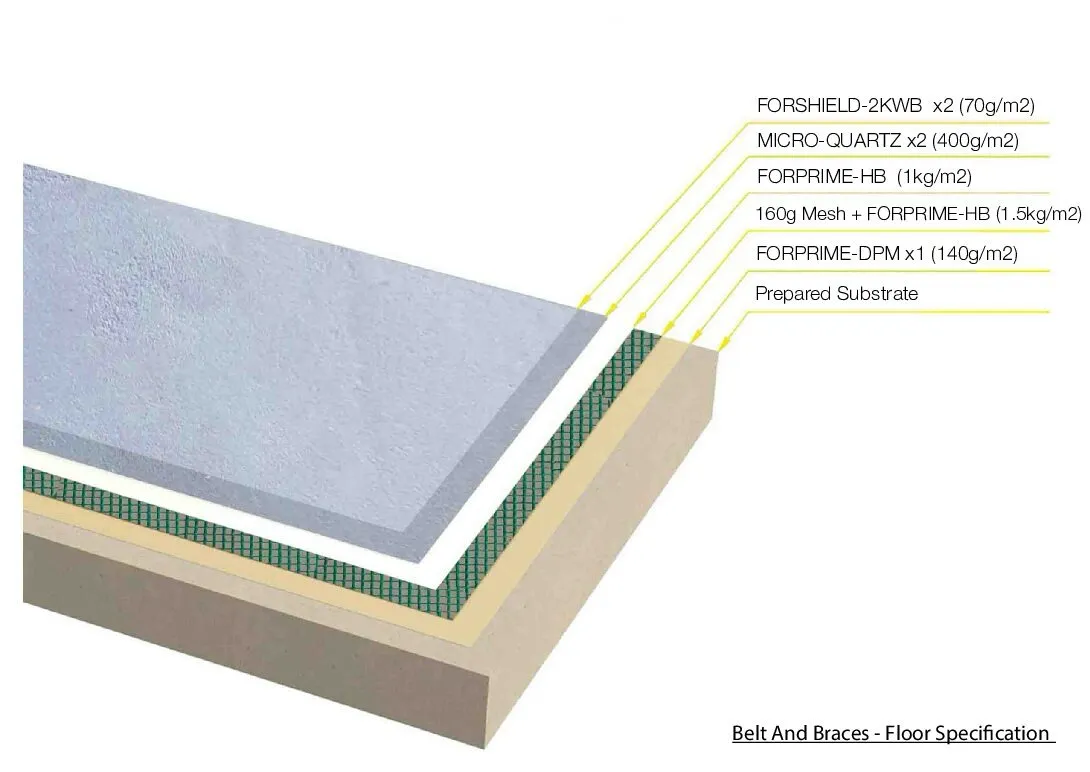
The finished result of a microcement floor speaks for itself: a seamless, clean surface with the aesthetic of concrete. But what you do not see is the work beneath it. Every floor we install consists of seven carefully applied layers. No single layer is merely decorative - each step has a technical function that makes the end result stronger, more durable and more waterproof.
Below, we explain step by step how the Forcrete Belt and Braces system is constructed. Not as a sales argument, but because we believe you should know what goes into your floor.
Step 1: Substrate preparation
Every microcement floor begins with the substrate. Whether it is an existing screed, anhydrite, tiles or a dry screed system: the base must be stable, clean and level. Loose material is removed, cracks are repaired and the surface is abraded for optimal adhesion.
During renovations, we install a lightweight dry screed where needed as a stable base. In new builds, we typically start directly on the existing screed. In both cases, we check moisture content and flatness before moving to the next step. A level substrate produces a level result. Irregularities in the base will be visible after completion - which is why we take time here.
Step 2: Fibreglass reinforcement
Across the entire surface, we apply a 160 g/m2 fibreglass mesh. Not only at vulnerable points such as transitions, corners and junctions, but wall to wall. This reinforcement layer distributes stress evenly across the whole surface.
Why does this matter? Every substrate moves. Temperature fluctuations, underfloor heating or natural settlement of the building create stress. Without reinforcement, that stress concentrates at the weakest points and causes cracking. With fibreglass reinforcement across the full surface, those forces are distributed, reducing the risk of cracking to virtually zero.
Step 3: Scratch coat with quartz sand
After the reinforcement, we apply a scratch coat. This is a two-component resin layer applied thinly over the reinforcement mesh. While the layer is still wet, fine quartz sand is broadcast across the surface. The sand embeds itself into the scratch coat, creating a mechanical bond comparable to sanding a surface before painting. The result is a strong, flexible base to which the microcement top layer adheres optimally.
Steps 4 and 5: Two colour coats of microcement
Now comes the decorative stage. In two separate layers, we apply the microcement mixed with the chosen colour pigment. The first layer builds the base. The second layer refines the texture and colour depth.
Each layer is applied by hand using the handfloated technique: laid on with a French knife and finished with a plastic trowel. By varying pressure, angle and speed, we create the characteristic cloudy patterning that makes microcement so appealing. No two square metres are identical.
Between the two layers, we lightly sand the surface. This removes imperfections and ensures optimal adhesion for the second coat. After the second layer, we sand again to achieve an even, smooth result.
Importantly, with the Forcrete system the microcement itself is already water-repellent. The waterproofing is not confined to the top protective layer, but present in every layer of the system. That is a fundamental difference from many other systems on the market.
Step 6: Sealer
After sanding the second colour coat, we apply a sealer. This transparent layer penetrates the microcement surface and fills the pores. The sealer strengthens the surface from within and prepares it for the final protective layer.
The sealer is not visible in the finished result, but its function is essential: it increases wear resistance, improves stain resistance and creates a uniform base for the topcoat.
Step 7: Topcoat
The final layer is the topcoat: a matte, transparent protective coat that seals the surface. The topcoat protects against daily wear, stains and moisture. With Forcrete, this layer is an additional safety margin, not the sole line of defence.
We apply the topcoat in a matte finish, so the natural character of the microcement is preserved. The surface feels silky smooth, is easy to maintain and retains its appearance for years.
Why this build-up makes the difference
Seven layers may sound like a lot, but every step has a purpose. The combination of reinforcement, bonding, decorative layers and protection forms an integrated system in which no single layer is redundant.
The total system is just 3 millimetres thick, yet delivers the performance of a much thicker floor finish. Fully waterproof, scratch-resistant and suitable for any room - from bathrooms and kitchens to living rooms and commercial spaces.
That is the difference between a microcement system that depends on one protective layer and a system in which every layer contributes to durability. No half measures, no weak links. Exactly how we work.
Curious how this would look in your space? Get in touch for a free consultation.
Pom Arnold · Founder and certified Forcrete installer
About Pom →Frequently asked questions
View these projects

Read also

Curious what microcement could do for your project?
Get in Touch